REDWOOD ROUND HOT TUB ASSEMBLY PROCEDURE
Unlike all others, our hot tubs are manufactured with perfect computerized accuracy and require absolutely no on-site milling or cutting of the final stave. Each tub fits together perfectly and assembles quite easily in an average time of less than 1 hour.
IMPORTANT:
Please read through the entire procedure
carefully before beginning the first step.
To assure a long-lived and structurally safe tub, a properly designed foundation is essential! To withstand the weight of the tub and water we recommend a minimum 4" thick reinforced concrete pad. If you have any questions please contact us for proper and adequate site preparation.
Step 1: Installing the Suctions
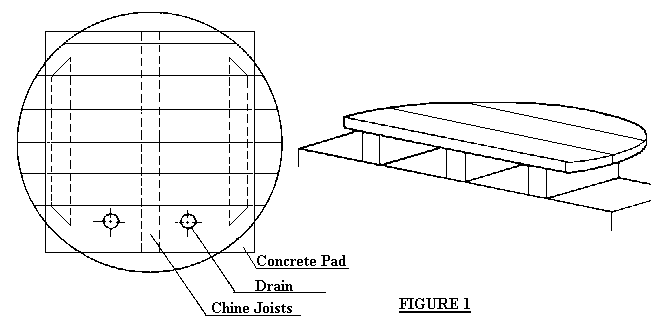
Place the chine joists on the concrete pad so that they are 5½" tall and arranged as shown in Figure 1. Check the chine joists with a level and make any necessary adjustments. Next, put the three dowel pins in one half of the bottom and place the bottom-half on top of the chine joists. Be sure the side of the bottom that is nicely sanded is the side that faces up.
If you plan to put one or two suctions in the floor of the tub, it is easiest done before the tub is assembled. If BOTH suctions are being installed in the floor (Figure 1), they should be separated by at least 3'. Be sure the location of the suctions does not interfere with the chine joists and be sure the holes are drilled wholly on one board. The suctions require a 2½" hole. If you use a holesaw you will have to drill from both sides of the board. This will eliminate any tear out from the bottom side.
To install the suctions, first slide the gasket on to the through-wall fitting. Then apply a generous bead of silicon sealant to the end of male threads of the through-wall. DO NOT apply silicone to the flange or the gasket. Next, slip the male threaded through-wall fitting into one of the holes. Screw the female threaded nut onto the suction body. Be careful not to overtighten the nut; snug hand tightening should suffice. (If the nut is screwed onto the through-wall too tightly, the swelling of the wood when it gets saturated may crack the flange, leading to leakage.) Repeat these assembly steps for the other suction. At this point it is advisable to complete any other plumbing that occurs underneath the tub.

STEP 2: Assembling the Base
Put the other half of the bottom on the chine joists and then slide the two bottom halves together, pushing them together as tightly as possible. Note that the bottom boards are placed perpendicular to the chine joists as shown in Figure 1. After the bottom is in place the two plywood strips supplied with the hot tub must be screwed down across the seam of the bottom halves. Place the strips about 3" in from either end of the perimeter of the tub. Use four 1" screws to secure each strip. Remove these strips after the hot tub is fully assembled. Please Note: Failure to use the plywood strips will cause trouble in later procedures.
STEP 3: Fitting the Staves to the Base
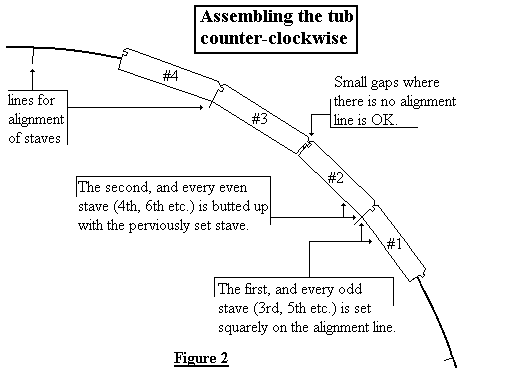
Each stave must be properly positioned between the alignment notches located around the perimeter of the bottom. You will note that in Figure 2, the side of the stave that has a tongue is centered directly on the alignment notch. The side of the stave that has a groove does not line up perfectly on center of the alignment notch. All the staves go on in this fashion. There will be gaps between every stave put on the tub. Do not worry about these gaps and do not drive the staves on with a mallet. The staves may be lightly tapped on with enough force to keep them from falling off. Once all of the staves are on, the tub is ready for the bottom band.

STEP 4: Applying and Tightening the Bands
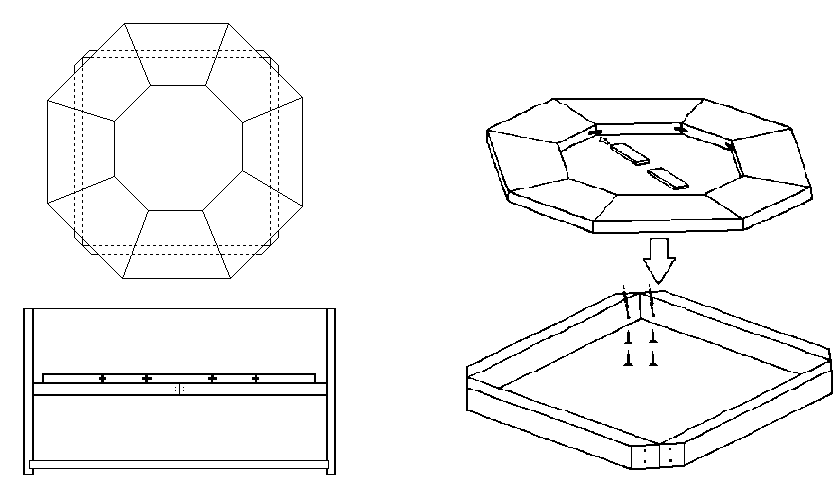
Figure 3 shows the bottom band at 42 5/8" down from the top. Drop the band over the top, lower it into position and tension the nuts a little so that the band does not fall off. Go around the tub with a tape measure and check the height of the band. Once the band is properly leveled, you may begin to tighten the band. This process is best performed by two people. While one person tightens the bands, the other person strikes the band with a soft face mallet. A metal mallet will also work but do not strike the band directly. Use a block of wood as a buffer. The stave boards should be driven on slowly. Start by gently pounding on each stave all the way around the tub. Make another revolution around the tub, pounding a little harder. And then another revolution pounding harder. The object is to drive the boards on evenly all around the tub. It usually takes 4 or 5 times around the tub to accomplish this. The bottom band requires a lot of tension. Tighten the bottom band nuts to the point where you meet a lot of resistance. Try to avoid stripping the nuts from overtightening. After the first band is completely installed, put the second band on 23¼" down from the top and tighten the nuts. The top band is placed 4" down from the top. This band does not require as much tensioning as the bottom band.

STEP 4: Finishing the Tank Top Rim
Go around the top rim of the tank with either an electric hand plane or a belt sander to level the top edge. If you use an electric plane, it’s a good idea to smooth the planed surface after-wards with a belt sander. Finally, round off the inside and outside edges of the top rim, using a router with a quarter-round-over bit.
INSTALLING THE BENCH
Follow the procedure outlined below to install the bench in the tub. All necessary parts have been provided, including hardware. Tools required include a variable speed electric drill, a #2 phillips head driver bit, a #10 pilot bit, a measuring tape, and a straightedge.
NOTE
To ensure that the screws will not go completely through the side of the tank, these holes MUST be drilled about 2-1/4" from the longer end of the beveled bench support and perpendicular to the beveled edge (i.e., at a 45º angle with respect to the outer surface of the support, and angled toward the bevel).
